Showing posts with label creative. Show all posts

Thursday, June 7, 2012

"C" is for "Colorful Cotton"

First . . . the children used a paintbrush and white glue to make a large "C" on a half-sheet of construction paper, then tore small pieces of cotton batting and attached them to the glue. (Tearing batting, as opposed to using cotton balls, was just an extra way to work on those ever-important fine-motor skills.)


Next . . . they used dot markers to add a little more color to their letters.


Finally . . . we strung them on our clothesline for a fun and bright classroom display :)


Friday, June 1, 2012

Magnetic Tube Marble Racing

I put this activity together as part of our Magnets unit, and it has remained a standby center in all the weeks since. (Perfect for the whole "motion" aspect of Transportation! The idea came from Teach Preschool.)


The children helped paint a bunch of cardboard tubes one day. Once dry, I wrapped each tube in contact paper for durability and attached two magnets (found at Daiso) using hot glue. That's it - stack the tubes (we used our magnetic whiteboard), add a few marbles, and see what happens!

The children love assembling the tubes in different ways, seeing how tall they can make their marble runs! The boys in the above photos were figuring out how big a gap they could leave between tubes before the marbles would escape. They also found some plastic containers to use for catching (or trying to catch!) their marbles as they came out.

Simple, inventive, and fun.

Saturday, May 26, 2012

"M" is for Marble Painting

A cookie sheet, marbles, and paint made for a fun process the children were eager to explore . . .


I think almost everyone made at least two paintings, and some enthusiastic participants made even more than that!

Thursday, May 24, 2012

Mural Close-Ups

. . . are finally here!

"R" is for "reef" -- on the sandy, sponge-painted ocean floor.
The children cut  and placed the seaweed themselves, too.

Colorful jellyfish floating by.

Our abstract cardboard fish incorporate scraps from a marble painting project earlier in the year, as well as weaving. (They were inspired by these.)

Cute cardboard squid, as seen previously in-process.

Is that a handprint I spy? :)

Saturday, May 19, 2012

"D" is for Doodles on Doilies

Say that three times fast ;)


Fun vocabulary, simple materials, and a sweet display make this project a keeper!

Tuesday, May 15, 2012

Making a Mural

We worked together to create a beautiful display for our Under the Sea theme last week.

Using recyclables (cardboard tubes and egg boxes), we painted a bubble-filled background on blue butcher paper . . . 


. . . while others worked to make cardboard squid:


Some of us sponge painted "R" shapes to look like reef. Did you know sponges actually come from the ocean? ;)


Eventually we added some other fun items, including the cool cardboard fish we'd been working on the week before - but not until we'd used them for a little addition practice!


We fished in two separate "ponds," gathering the fish in a basket, then counted our total catch. (The process was similar to what we did here with eggs. This time, however, some children drew out their own addition problems as a way of leaning into that next developmental step.)

Our mural is now hanging in the corridor, and we've been getting lots of compliments on our hard work! As always, pictures of the finished product to come . . . stay tuned :)


Saturday, April 28, 2012

Bear Surgery

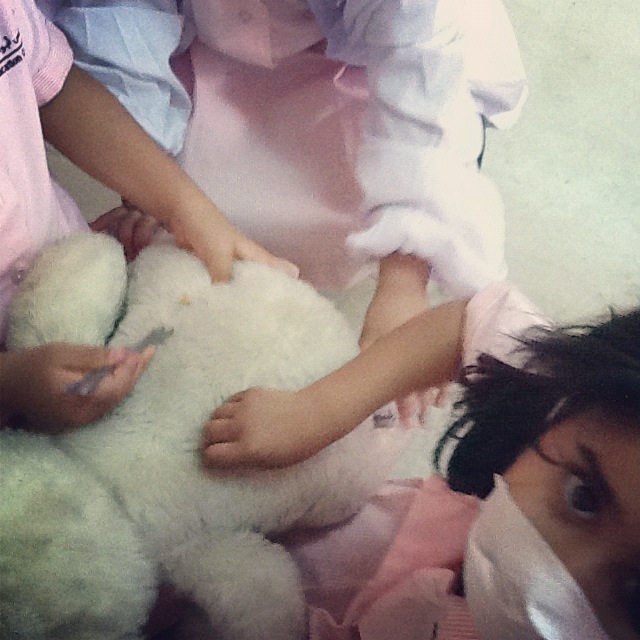
There was an emergency play dough removal that took place in our classroom the other day. . .


I'm sure the bear's the better for it :)

It amazes me what children come up with. A lab coat from the science center (must've had those masks still in the pockets), a wrench from the magnet station, and a teddy bear from the reading corner turned into something excellent.

I live for the brilliant, unexpected moments like these. Children are so incredible. What an honor to spend my days with these creative little humans.

Making Paper

We did this activity as part of our study on solids and liquids. It was also a great tie-in with our recycling theme the following week. I try to consciously incorporate "bridges" most weeks -- activities that suit our current focus but also link to whatever we're planning to cover the following week. It gives the children an additional reference point to help them connect with new learning.


After morning circle, we spent some time tearing old paper scraps (more leftovers from this project) into very tiny pieces and left them to soak in a tub of water.


A few hours later, the paper had absorbed a decent amount of water (and those big pieces in the photo above had been re-shredded!). I used an immersion blender to pulverize the wet scraps a little at a time. The children thought it looked like ice cream! (But we all agreed it was probably best not to take a taste.)

Unfortunately, there are no photos of the blending step, as I was teaching on my own this particular day. However, the fact that we managed to finish this project, just one teacher and 22 little ones, tells you how fun and easy it is!


Finally, we spread our paper mush out on some towels and patted it out like a pizza crust. We also pressed dish towels on top to absorb the excess water. Once our paper "dough" was nice and flat, we placed another thick towel on top, as well as some heavy bins. Two days later, voila -- we had paper! Not sure what we'll use it for yet, but I'll be sure to share once we figure it out!


Monday, April 23, 2012

Story of the Week: Stars

We spent last week exploring solids and liquids. Towards the end of the week, Salwa and I co-read the book Stars by Mary Lyn Ray, illustrated by Marla Frazee.

Because this book is a bit longer and requires some deeper thinking on the part of the children, it was easier for them to engage when listening in both languages. I'd start by reading a page in English, then Salwa would translate and clarify.

We found Stars to be a very soothing book; our class was drawn in slowly, calmly, one page at a time.


After reading we posed a question to the children: What is a star?

The children knew stars were neither solid nor liquid, and it was interesting to watch them contemplate the possible answers to the question. We touched briefly on the idea of gas (which we explored again the next day . . . but more on that later!). The idea wasn't to reach a concrete definition or give them any kind of direct explanation -- we just wanted to get them thinking and hopefully asking more questions.

As a follow up to the book and discussion, we explored a new-to-us process: bubble painting! 


We mixed dish soap, paint, and water in a small container, then used a straw to make colorful bubbles.


After giving the children plenty of time to explore the bubble-making process, we gave them star cutouts to make prints with the bubbles:


It was a great way link what we already knew about liquids with a new concept (our breath as the gas that makes the bubbles), and in the context of a beautiful story and project.

Yet another one we just can't wait to display!